
RIBBON SKIRT TUTORIAL


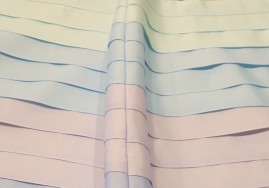
The subtle ombre effect of Julie’s skirt is achieved by 4 tonal shades in the same color family, or you may prefer to use contrasting colors, or even one shade for the entire skirt. For a young girl’s skirt, polka dot or other patterned ribbon would be adorable. It’s your project… personalize it as you like!”
___________________
SUPPLIES
1. Your favorite straight skirt pattern (Julie used McCalls 3830)
2. 1 yard good quality prewashed cotton fabric for your skirt base (Julie recommends Kona cotton)
3. Fusible interfacing for the skirt facings
4. 1 9” invisible zipper in a color to coordinate with your ribbon
5. 1 hook and eye
6. 1 package double fold seam binding for seam finishing, if desired
7. 1 ½” wide grosgrain ribbon.
Julie’s skirt which is a finished length of 19” has 14 rows, not including the waistband. Add rows accordingly for additional length. The ribbon quantities for Julie’s pattern size 10, graded to 12 at the hip are:
8. 2 ½ yards (bottom 2 rows)
9. 5 yards (rows 3-6)
10. 5 yards (rows 7-10)
11. 5 yards (rows 11-14)
12. 1 yard 3” wide grosgrain ribbon for the top layer (waistband)
TOTAL RIBBON FOR SKIRT: 17 1/2 yards of 1 1/2″ grosgrain ribbon WAISTBAND: 1 yard 3″ grosgrain ribbon
13. Thread in colors to match your ribbon. Note – since the seam for each layer is hidden by the layer above, it’s not imperative to match each ribbon color exactly. The waistband ribbon is the only row which you should match closely since it is topstitched.
RIBBON SOURCE:
http://www.hairbowcenter.com/Grosgrain-Ribbon.aspx
INSTRUCTIONS:
(Sarah’s skirt is illustrated.)
Cutting the skirt base
- VERY IMPORTANT!! Be sure to cut your skirt out a size larger than you normally wear. Attaching the ribbon can create an ease stitching effect resulting in a slightly smaller size than you started with.
- The zipper will be inserted in the left side seam leaving the ribbon uninterrupted in back, so if your pattern is one with a center back zipper, ignore this and cut the skirt back on the fold instead.
1. Mark the front and back darts and sew as directed. Mark the zipper placement with a dot in the left side seam as your pattern directs.
2. Hem the bottom edge of the front and back sections to your desired length with a simple double fold and machine stitching. This will be hidden by your bottom row of ribbon so there’s no need to finish by hand.

- Skirt Front with darts and maching hem


- Skirt Back with darts and machine hem. Zipper marked on skirt left

Ribbon Attachment
3. Now begin “shingling” your ribbon rows. Press each ribbon row just prior to pinning itand again after sewing it down and removing the pins so that it lies perfectly flat.
4. Attach the bottom row by marking ¾” from the hemmed edge of your skirt. Use a tiny dot of disappearing marker every 4 inches across and connect the dots using a ruler.

- Skirt Front marked ¾” from the hemmed edge of skirt

5. Now carefully pin your ribbon along this line so that the lower edge of your ribbon extends ¾” below the finished edge of your skirt base. Leave an overhang of about ½” at each side seam. Don’t worry about trimming the overhang now; you’ll do it all in one step after all rows are attached. The success of your side seam matching later on will depend on careful measuring, marking and pressing.
6. Sewing as close to the upper edge of the ribbon as possible, attach the first row of ribbon using a 2.5 stitch length.
7. Lay skirt face up and mark another row of connected dots 1 1/4” from the top edge of the ribbon row you just attached. Pin and sew your second row of ribbon exactly on this line.This row will now overlap the first row by 1/4”, hiding the seam.

- Bottom row sew along marked line leaving a 1/2 inch overhang. Next row is marked.

8. Continue marking and pinning in a similar manner, changing ribbon colors as desired, to within 2 inches (measured at the side seam) of the waist.

- Color waves 1 and 2 attached.


- Colors 1, 2 and 3 attached


- Colors 1, 2 3 and 4 attached.

9. Since the waistline of McCalls 3830 is slightly curved, a wider ribbon is required for the top layer. Pin the 3” waistline ribbon to the skirt base, overlapping the ribbon row beneath it by 1/4”. Sew this edge down to prevent rolling and seam exposure. Trim the top edge of the waistline ribbon to match your skirt base’s upper edge and baste. Press.

- All colors attached.

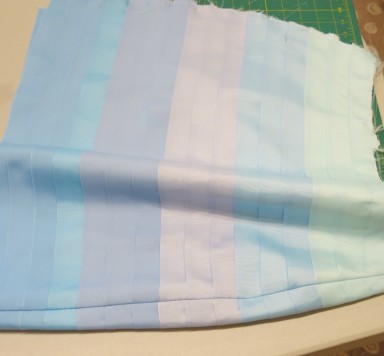
10. Lay your skirt panel with all ribbon rows attached face down and trim the excess ribbon at the sides, following the outline of your skirt base. Pin and baste each side edge so that all rows are now secured to the base. Tip – start at the top and sew down so that all rows remain flat.

- Ribbons attached, trimmed and basted.
- 10. Lay your skirt panel with all ribbon rows attached face down and trim the excess ribbon at the sides, following the outline of your skirt base. Pin and baste each side edge so that all rows are now secured to the base. Tip – start at the top and sew down so that all rows remain flat.
- Ribbons attached, trimmed and basted.
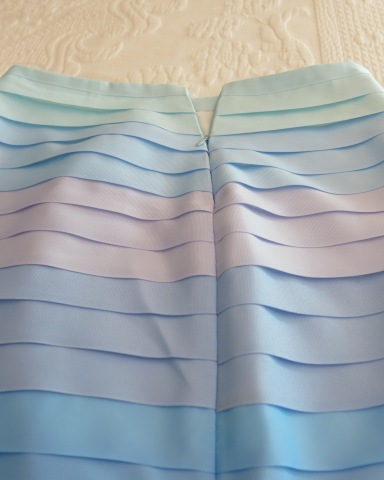
11. Complete skirt back in the same manner.
- If you have marked and attached all rows carefully, the side seams should match at each ribbon row.
- 12. Press each completed section and with right sides facing, pin and sew the front to the back at the right side seam.
13. Finish the seam allowances as desired. Julie serged her seam allowances and pressed the seam open while Sarah bound the edges. A press ham was necessary for this curved seam.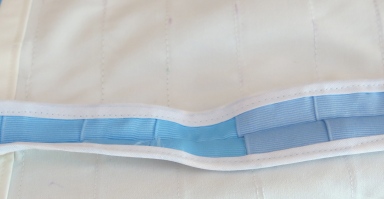
Moment of truth! How did you do?
14. Insert an invisible zipper in the left side seam.
15. Pin and sew the left side seam from the zipper placement dot to the lower hem.
16. Finish seam allowances as desired.
17. Staystitch the waistline 1/2″ from upper edge.
18. Add waistline facings as your pattern directs and finish with a hook and eye above the zipper. (Sarah faced the waistline with a matching ribbon to the top row.)
Wear your skirt and enjoy all the oohs and aahs!! (Dry clean only!)


