

10 Feb The Tango Tunic
I wish I could say ‘Greetings from the lovely Palmetto Bluff Montage Resort in lovely Bluffton, SC!’ It was a paradise that lasted for three lovely days……

but back to the tunic……..I think I’ve got this.
I’ve just returned from Cleveland where I had the privilege to tape three episodes of the PBS show It’s Sew Easy. The third taping was a tutorial dedicated to adapting a downloaded embroidered neckline file to a commercial tunic pattern. Don’t be fooled by the lovely courtyard beyond the French doors. It was 15° and snowing 😉

Obviously this garment is not meant to be worn in snow so let’s go back to paradise.

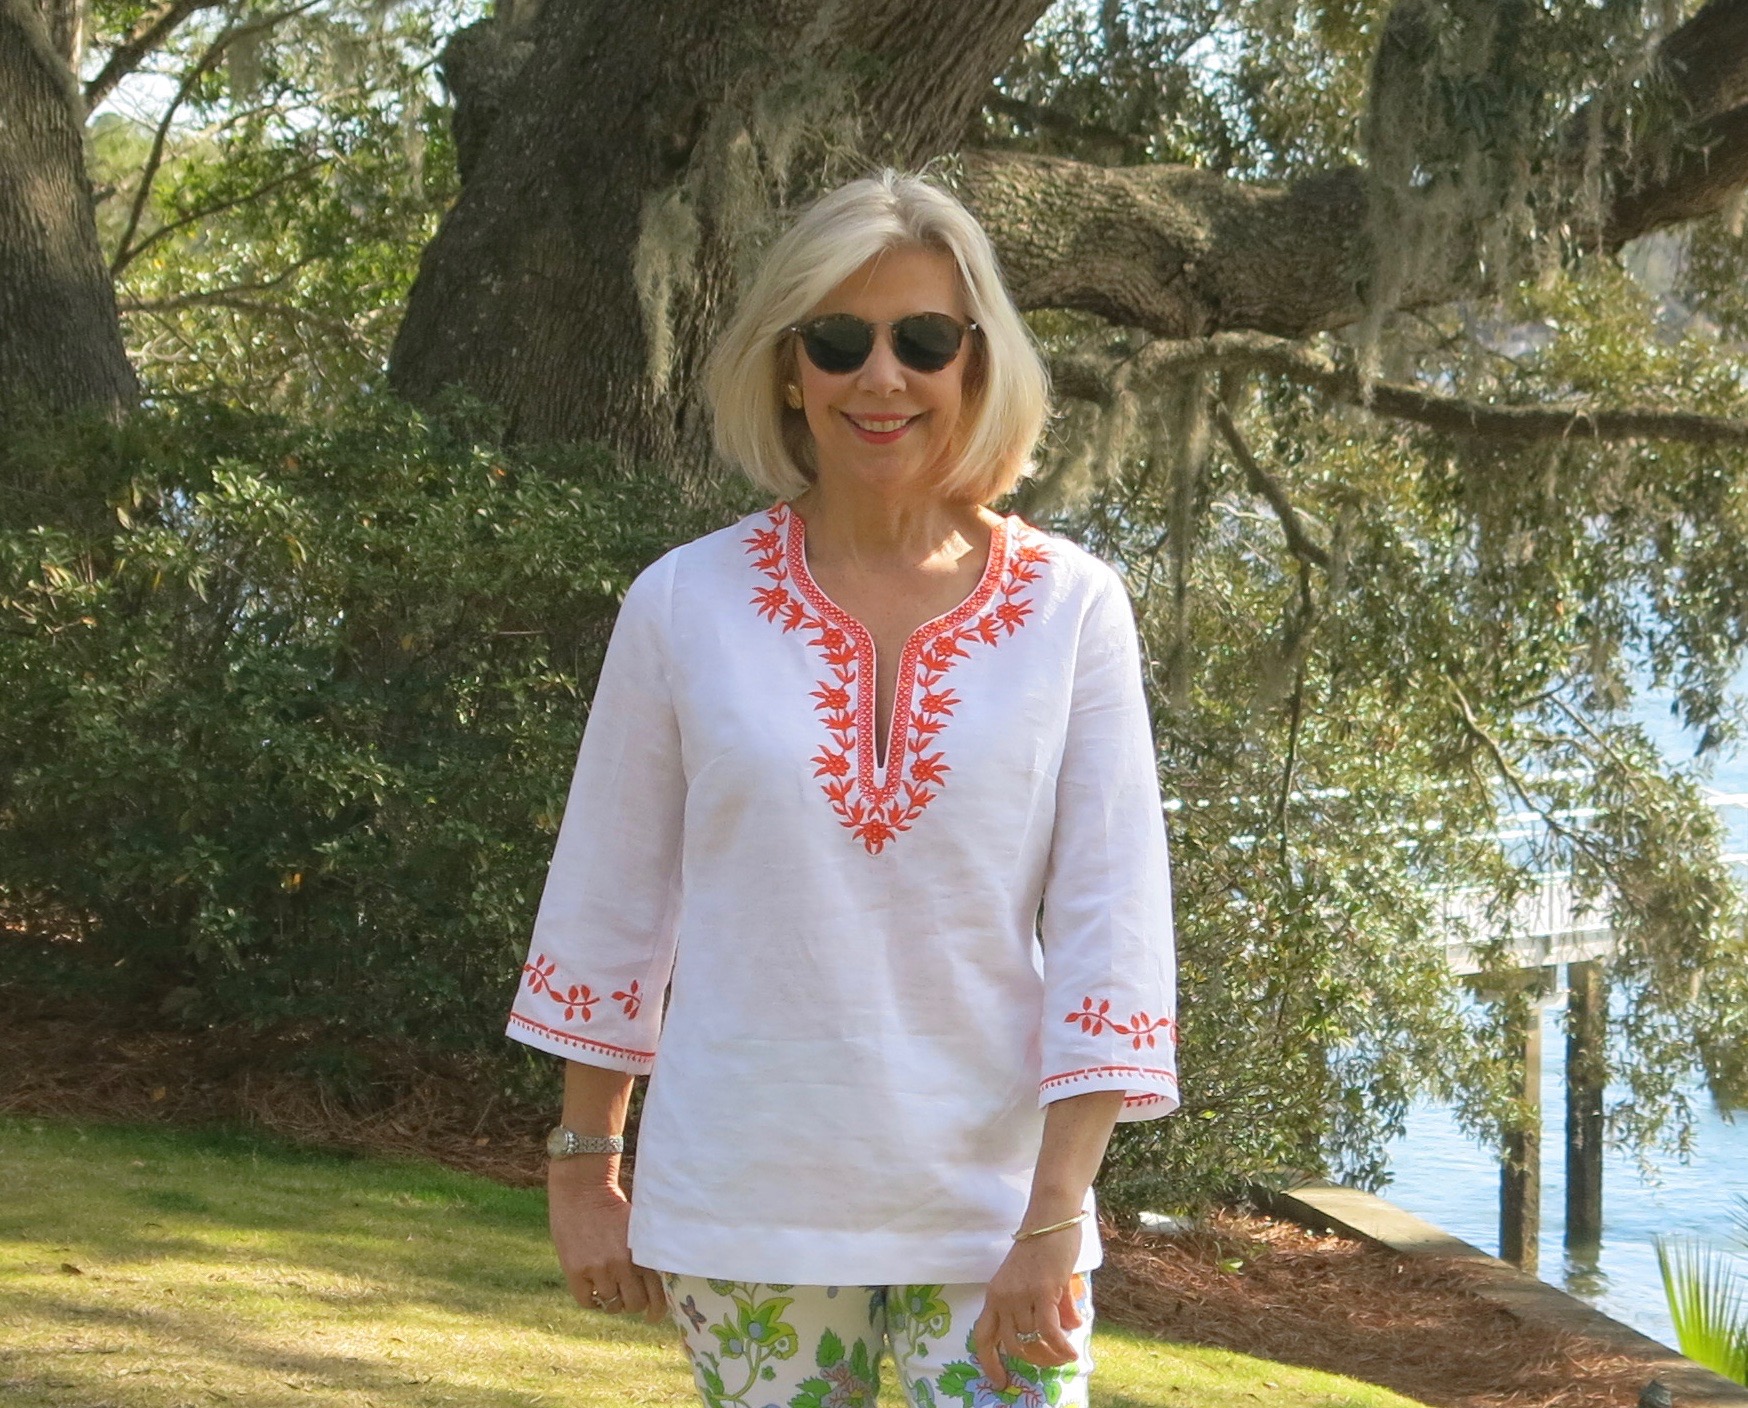
Since my first embroidered neckline tunic blogged on December 2, I’ve learned a lot in part to your expertise. Many thanks to all experienced embroidery readers for your helpful comments and constructive criticism.
For the holiday embroidered neckline tunic I used tricky fabric and an insufficient stabilizer. For this tunic, linen and a heavier tear-away stabilizer did the trick.
So starting from the beginning. I love orange and threaded my machine with Coats and Clark Trilobal Embroidery Thread in Tango.
Then, I followed the steps below:
- Create or Select an embroidery neckline design and download to the embroidery machine. My design is from embdesigntube.com . The website offers hundreds of options.

- Start with a rectangular piece of fabric a little larger than the tunic front bodice.
- Trace the tunic bodice front shoulders, neckline and armscyes with a heat soluble marker. Do not cut pattern piece!
- Thread trace the center line from the neckline to the bottom of the bodice. This serves as your placement guide and will make sure your embroidery is on the grainline.
- Depending on your hoop size you may be able to embroider the entire design at once. If you work from a smaller hoop you may need to divide the design.

- Once the design is completed it will look like something this.

- Remove stabilizer. (note photo below has a little stabilizer left around lower inner neckline).

- Cut a piece of fashion fabric slightly larger than the embroidery design and interface with a lightweight knit interfacing. I like Pellon Easy Knit Fusible.
- Place the fabric over the front of the embroidered neckline. RIGHT SIDES TOGETHER.

- Secure with a few pins. Flip to the back secure with a few more pins.
- Stitch around neckline following the embroidery design. (photo below is from another sample).

SAMPLE
- Cut away excess fabric.

- Turn fabric to the inside of the bodice and press.
- You now have created a facing. Depending on the sheerness of your fabric you can finish the facing in one of two ways.
- Cut facing in same shape as neckline design allowing for a ½” seam finish. Turn and finish outer edge or serge.

- If your fabric is sheer, Cut the facing down to 1” following the inner neckline design, turn and finish by slip stitching to the back of the garment.

- Fine tune the pattern placement and pin in place. Your heat soluble markings will be gone but the centerline remains and will serve as your placement guide.
- I like to catch the very top of design in shoulder seam so it’s not floating on top of the tunic bodice. It might be necessary to sacrifice some of the embroidery.
- Pin the bodice pattern piece to the fabric and cut.
- You now have a tunic bodice ready to assemble with a finished neckline!


It’s Sew Easy 😉
I embellished the lower edge of the sleeve with a repeated vine motif from the Pfaff Embroidery Collection for the Creative Icon.
I experimented with several decorative 9mm stitches to cover the machine hemline in the sleeve before making a selection.


The ultra casual nature of this tunic influenced me to keep a relaxed fit.

As I mentioned in December, I’ve noticed a shorter length trending on many designer tunics. Personally, I find the shorter length to be a better one for me, and this tunic is shorter than many from the The Tunic Bible.


My only challenge now is to patiently wait for warm weather or visit a tropical island. Something tells me I’ll be playing the waiting game 😉
Have a good one!


Trina Draper
Posted at 16:26h, 10 FebruaryBrilliant! The downloadable design site you attached is a wonderful resource! How do you find such things? I’m currently shopping for a lower end machine that does both heirloom and embroidery stitching, while still being able to upload my own and other designs to it’s platform. Any suggestions on how to find this wonder machine?
goodbyevalentino
Posted at 06:30h, 11 FebruaryMany thanks, Trina! I found the website by googling ‘Embroidered neckline downloadable files’ or something like that………
As for the machine, I would visit dealers and tell them what you are looking for. There are so many machines on the market!!!! PFAFF offers 20 different models, so I’m sure if you start investigating the market you’ll find a machine that meets your needs. Good luck 😊
Molly Hayden
Posted at 16:39h, 10 FebruaryThank you so very much for posting this tutorial Sarah. I have been hesitant to try this type of embroidery for fear of really messing it all up but your explanation clears up many questions for me immediately. Now I need to conquer a fitting issue and I am all set to give it a go. m
goodbyevalentino
Posted at 06:23h, 11 FebruaryWonderful, Molly!!!! Try out a sample first, but it’s really not difficult to do. Good luck and send me a pic once it’s done 😊
Gail Cunningham
Posted at 18:30h, 10 FebruarySarah, you’ve inspired me to try machine embroidery….so much so that I recently purchased a used Bernina 830 from EBay, and now I’m allowing it to collect dust as I machine quilt on my other Bernina, and occasionally look at the 830, feeling overwhelmed with my purchase! Just keep posting your creations and one of these days I will purchase The Tunic Bible and start the embroidery lessons!
goodbyevalentino
Posted at 06:22h, 11 FebruaryLOL – So much sewing and so little time!!!!! Many thanks for your comment, Gail 😊
Vanessa Thomas
Posted at 18:56h, 10 FebruaryI love the embroidery!! It looks and sounds so complicated, but it looks like it is worth the effort. I haven’t tried embroidery yet, but love seeing what you create!
goodbyevalentino
Posted at 06:20h, 11 FebruaryThank you, Vanessa! Really, it’s not complicated once you learn to use an embroidery machine. 😉
MaryEllen
Posted at 20:39h, 10 FebruaryThanks Sarah for this wonderful tutorial !! I’m ready now to tackle a project like this . Thanks for all the our hard work on the RTW Fast !
goodbyevalentino
Posted at 06:20h, 11 FebruaryThank you, Mary Ellen. Please send me a pic of your tunic should you decide to make one. …..My pleasure to host the RTW FAST. 😉
Lone Star Couture
Posted at 21:44h, 10 FebruaryThis is an amazing accomplishment! Congrats!
goodbyevalentino
Posted at 06:18h, 11 FebruaryMany thanks, Dorcas! Lots of fun to do 🤗
Rebecca Holdsworth
Posted at 00:45h, 11 FebruaryLove it! Great job again. Considering tomorrow’s temp, you could actually put it on and pretend……………
Becky
goodbyevalentino
Posted at 06:17h, 11 FebruaryThank you, Rebecca! I think I’ll wait 😉
Suzanne Landau
Posted at 01:14h, 11 FebruaryVery nice. You are incredibly lucky to have been gifted such a wonderful embroidery machine and I understand you need to show everyone who subscribes to your website and blog just how great it is, and indeed it is but most of us don’t have a machine such as this. So, whilst I am inspired to create embroidery using my Elna sewing machine, it will never be a patch on what you create. I miss seeing all your new garments. When are you going back to that?
goodbyevalentino
Posted at 06:16h, 11 FebruaryIt’s a new phase of sewing for me Suzanne, While I’ll continue to sew non-embroidered clothes such as my last six garments, I’ll also continue to learn new embroidery techniques. One doesn’t need the exact machine I have to make this neckline.
Susan
Posted at 06:30h, 11 FebruaryWelcome from the Ohio’s North Coast! I”ll be watching our TV listings. Do you know when this will air?
goodbyevalentino
Posted at 07:02h, 11 FebruaryThank you, Susan! Wish I had had more time to explore your great city – hopefully another time 😉 I’m told the shows will air in the Spring and Fall. I’ll let you know once I have the specifics.
Becky Thompson
Posted at 09:25h, 11 FebruarySarah, I just don’t get it. I can’t wrap my head around how you take an embroidered square and make it look like the entire bodice piece wasn’t hooped. I read and re-read and my mind is baffled. I’m in your Fasters group and have The Tunic Bible. If this technique is shown in detail, which page? I never see It’s so Easy so I’ll have to wait until next season when they release it on YouTube.
goodbyevalentino
Posted at 11:47h, 11 FebruaryBecky –
I discovered how to adapt an embroidered neckline file after getting the Creative Icon which was after the publication of The Tunic Bible.
Embroider the neckline in the hoop on a rectangular piece of fabric. Take it off of the hoop remove the stabilizer and go to step 8. Follow the steps through #17. Then you place the pattern on top of the fabric and cut out the bodice.
Let me know if you don’t understand. 😉
Linda Brooks
Posted at 14:47h, 12 FebruaryI am with Becky on this. I am thinking the square of fabric you start with on the embroidered piece has to be big enough to be the piece that will become the front of the tunic when you cut out the pattern. In the pictures it looks smaller. It makes me wonder how you do it with a smaller square.
Marjorie Graham
Posted at 12:11h, 11 FebruaryThank you for all the technical info on the embroidery part. This is on my list for the spring.
Love the tunic, love the orange!
goodbyevalentino
Posted at 13:45h, 11 FebruaryThank you, Marjorie!
Sue
Posted at 14:34h, 11 FebruarySarah, I love this neckline. Can you give me the design number, which I haven’t been able to locate; there are so many, and I like that this one is not too dense. Thank you. Can’t wait to try it.
goodbyevalentino
Posted at 15:35h, 11 FebruaryThank you, Sue! https://www.embdesigntube.com/designs/chamsa-algerian-traditional-dress-embroidery-design
MaryEllen
Posted at 14:34h, 12 FebruaryThanks for the direct #to the design – I also looked bu couldn’t find . They are all so beautiful it will be hard to choose one embroidery design -thx
Karen Helm
Posted at 14:52h, 11 FebruaryA very professional and artistic outcome, Sarah. The tango color is terrific!
goodbyevalentino
Posted at 15:37h, 11 FebruaryThank you, Karen! I can’t get enough of this luscious color 😉
Janine
Posted at 15:55h, 11 FebruarySarah, thanks so much for the very helpful post. I’ve been dipping my toes into embroidery but never get anything straight so your tips are much appreciated. My tulips are poking up in Atlanta, so spring is on the way and you should be able to wear your beautiful tunic soon! x
goodbyevalentino
Posted at 16:49h, 11 FebruaryMany thanks, Janine – glad the post was helpful! I’d say this tunic is a late spring and summer tunic, but that’s ok 😊
Marianne Johansson
Posted at 09:48h, 12 FebruaryIt’s a beautiful blouse (?) I whish I had an embroyderi machine !
And I also liked the art on the Wall, with safetypins !! Soo cool 😘
goodbyevalentino
Posted at 10:05h, 12 FebruaryThank you, Marianne! I liked the studio ‘art’ too 😊
Mary Funt
Posted at 20:10h, 12 FebruaryWonderful design! I love the colors and your use of a complimentary design on the sleeves. I’ve also looked at the website you used for the design and am considering several options for my own version. Thanks for the inspiration.
goodbyevalentino
Posted at 06:24h, 15 FebruaryThank you, Mary! Look forward to seeing your embroidered tunic 😊😊
Ardy Wolynec
Posted at 20:53h, 12 FebruaryThank you for your informative article! Your tunic is lovely.
goodbyevalentino
Posted at 06:25h, 15 FebruaryMany thanks, Ardy!
Nnenne Aja-Onu
Posted at 11:23h, 14 FebruaryVery beautiful Tunic! Thanks Sarah for sharing these techniques.
goodbyevalentino
Posted at 06:25h, 15 FebruaryMany thanks for your comment, Nnenne 😉
Andria Houghton
Posted at 16:07h, 14 FebruaryI found you looking for a review of the Pfaff Creative Icon. What a treasure-trove of information you are!
My Creative Vision, with the embroidery attachment, fell to the ground. Even if it is fixable (a few plastic pieces broke off), I know I will never trust it again, and while working with it was fun, there were many frustrations.
Now that you have done several projects with the Creative Icon, are you still as enthusiastic? Have you found any negatives at all?
goodbyevalentino
Posted at 06:27h, 15 FebruaryAndria ~ Thank you so much for your comment. I have not encountered any frustrations with the Creative Icon. It’s unlike any machine I’ve ever used and I still have a lot to learn 😊
Andria Houghton
Posted at 15:56h, 15 FebruaryI am test driving one on Sunday, and learning something new thrills me beyond reason. I read a profoundly wise observation just recently: “when you announce you’re too old to learn, life starts passing you by – quickly – at any age..” 😉
My goofy, glamour-puss mother died recently. She was an expert seamstress, and, at 6′ tall, needed to sew her own clothes. She was curious, and loved learning as much as she loved teaching (first grade for 42 years). I insist that she will be with me absorbing our new skills. I have her collection of stunning fashion fabric, and the day after she died, I went to the fabric store and bought 4 yards of devoré with no idea what it will become…just as Mom would have done.
goodbyevalentino
Posted at 17:13h, 16 FebruaryAndria,
I’m so sorry about your mother’s death and hope you will find comfort in your sewing. Don’t you know she’d love seeing the Creative Icon!
Best wishes to you and enjoy your devore´. Take care 😉
Kathleen A Kolb
Posted at 06:53h, 01 MarchReceived your Tunic Bible for Christmas and then discovered this blog. Feeling so inspired! Have not sewn clothing for myself in years, except for a simple pull over shirt. I too have a Pfaff, Creative Sensation Pro II. Have done allot of simple embroidery and applique on t-shirts for myself and my grands. Just love tunics and have a stash that I have been collecting for these garments.
With your book and encouragement I hope to finally create some. Thank you so much Sarah!
I really love this embroidered tunic and hope to tackle one after I get the basics down. Hope to fill my closet with wonderful tunics just as you have!
Ann Beard
Posted at 10:10h, 08 AprilI just found you and love you. Thank you, World for bringing her to all of us Creative Makers. BTW: I loved the pictures at Bo—-et Marina, ( name incomplete to protect the innocent). Bought your Tunic Bible last year and still waiting to create something. Now I have the inspiration. Big hug,
Ann B., Chagrin Falls, OH
Carmen Salome
Posted at 06:45h, 19 AprilIts beautiful. Is this something i can do on a regular machine? My Singer HD machine has decorative stitches. I’ve never used the feature just wondered if it could be done in this application.